Greenhouse Completed!

Just in time for my spring transplant-starting rush, I've finally finished the last improvements in the seedling greenhouse.

The passive solar absorber is great at heating up the air inside when the sun is shining, and the double layered plastic skin on the structure holds heat better than a single layer, but the structure is still subject to large temperature swings, especially at night. It's frustrating to reach temperatures hot enough to fry seedlings during the day (which means I ventilate the greenhouse to cool it off), only to see temperatures drop to freezing overnight. The trick here is to try to smooth out the highs and lows in temperature.

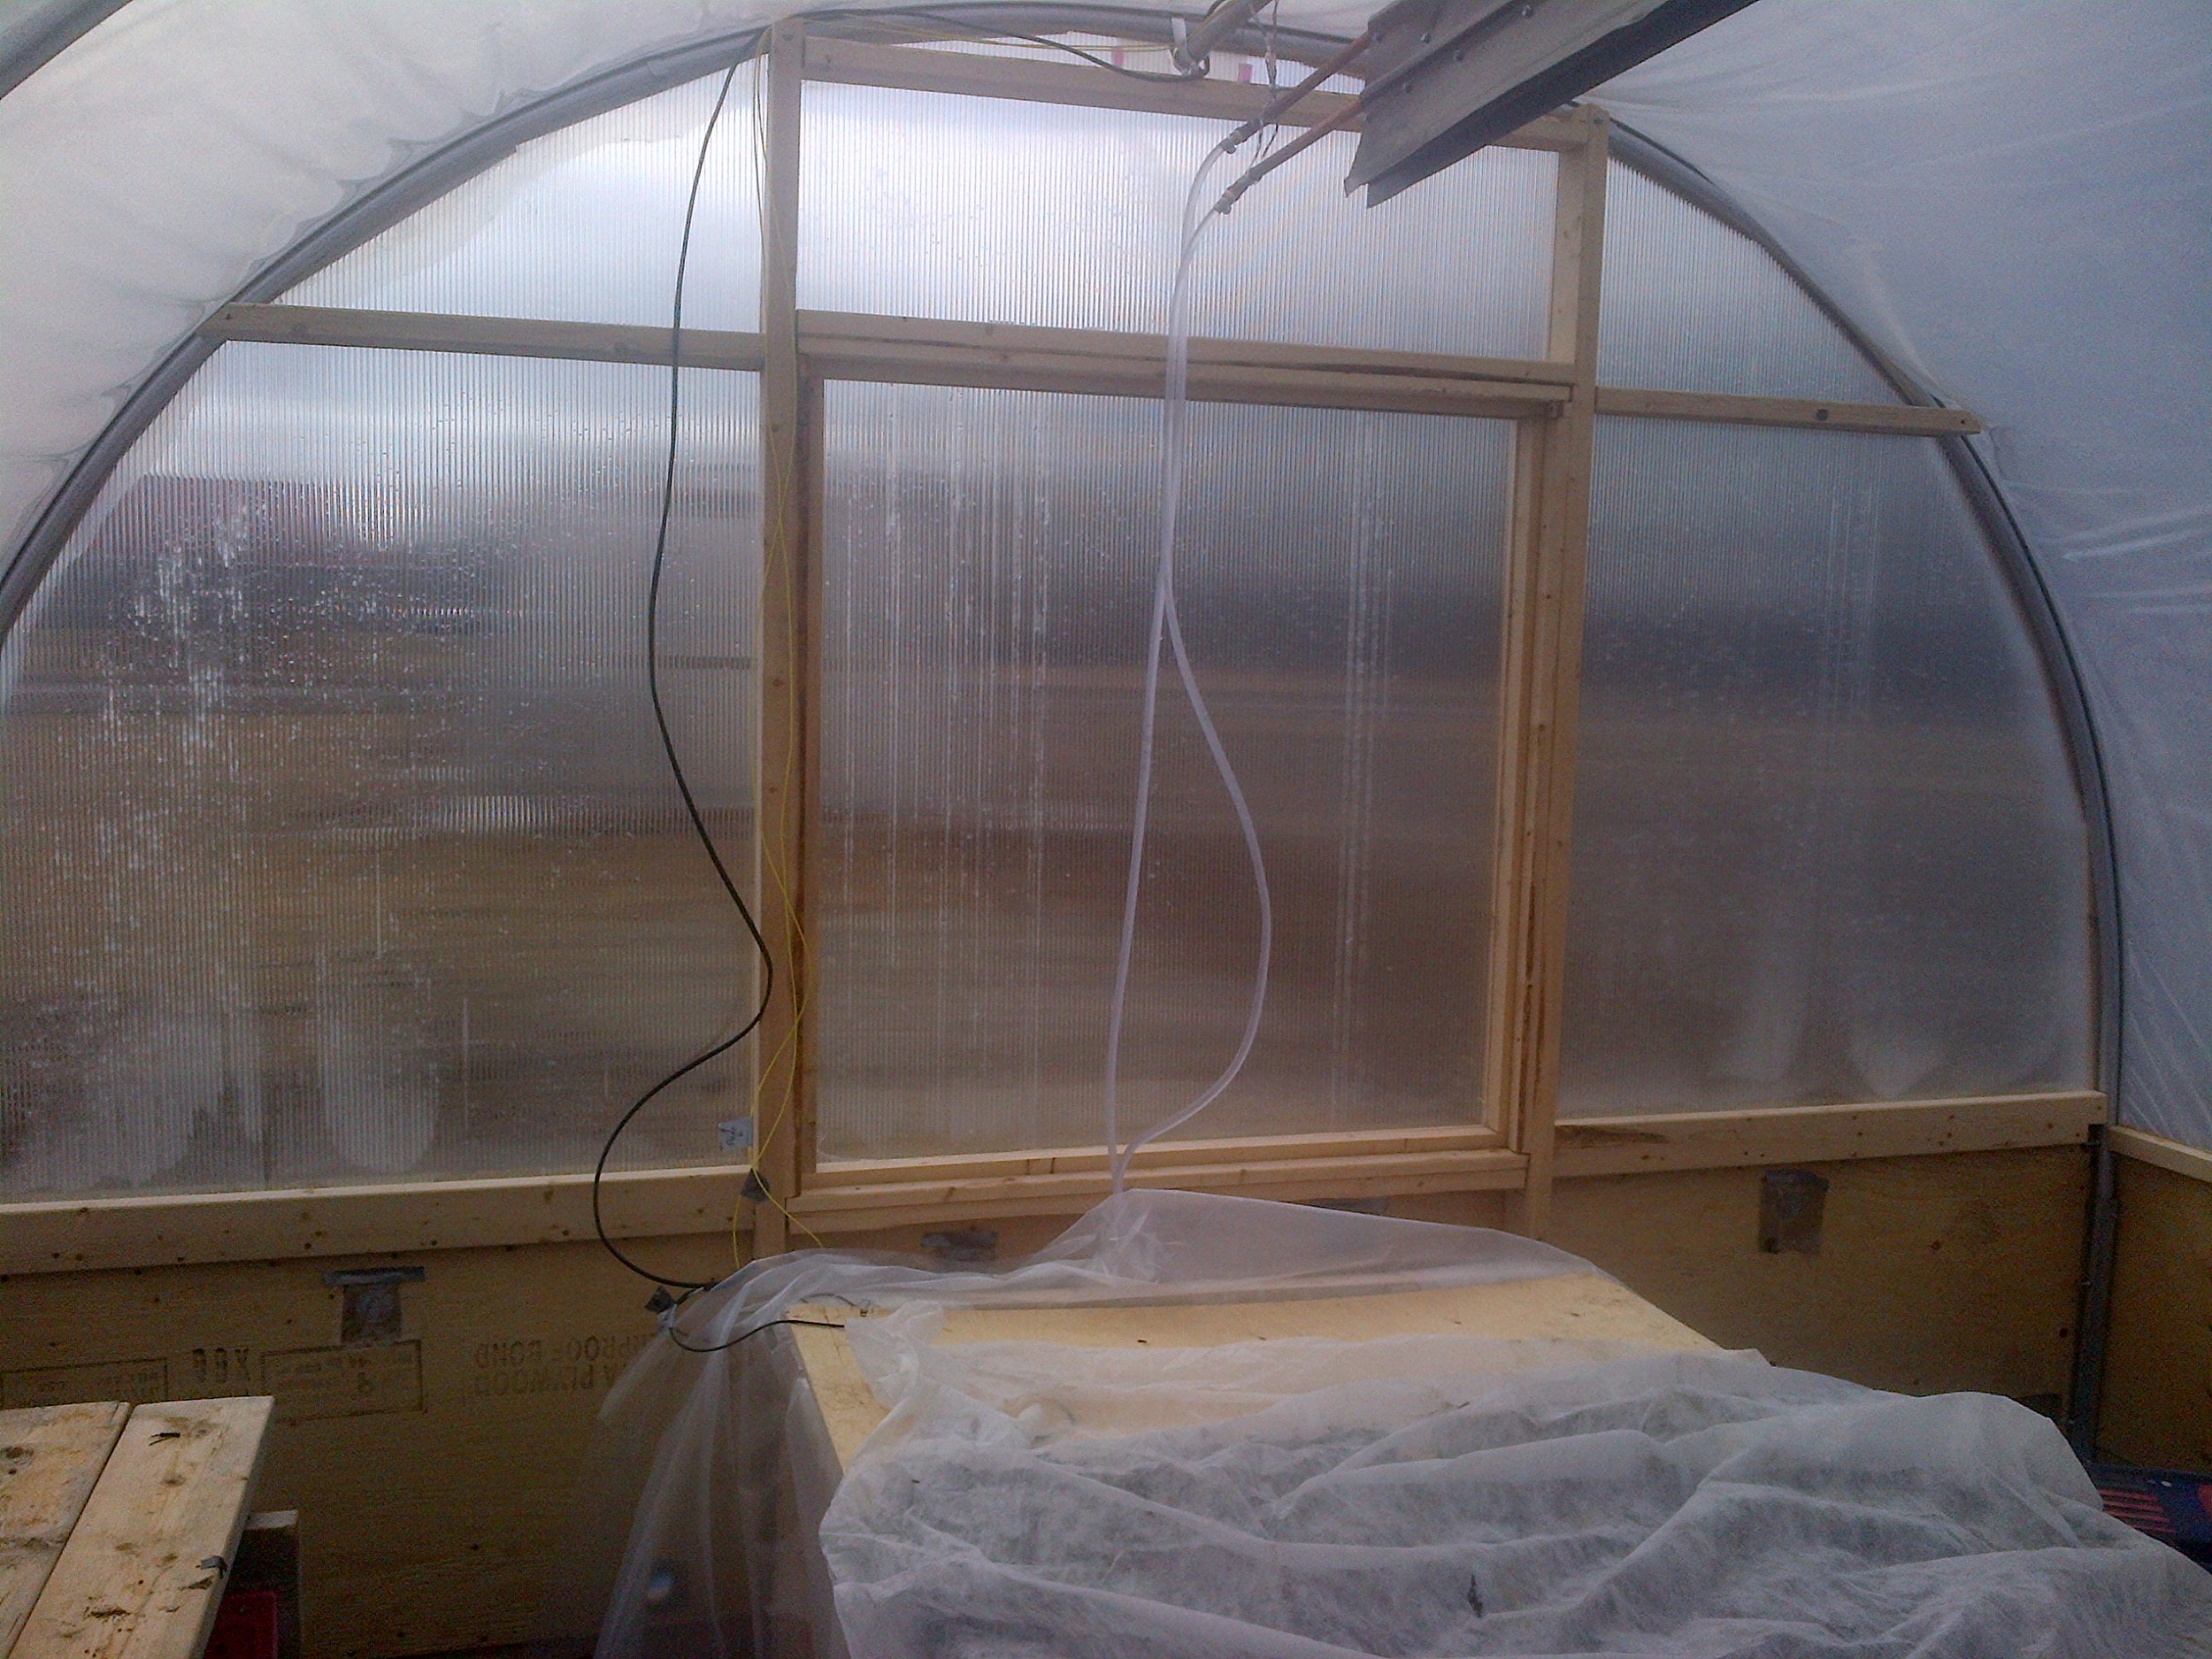
The core of the system is a 500 gallon water tank / seedling table. Since water has a much higher heat capacity than air, this represents a huge amount of heat storage (roughly 4000 BTU per degree F in the tank). The tank is insulated with rigid foam on the bottom and all sides, but the top is left uninsulated, which is where the most tender seedlings will be placed (thus giving them passive protection from cold air by way of gentle bottom heat).

I decided to build the tank out of plywood, insulated with rigid foam and lined with polyethylene film (the same clear plastic that covers the greenhouse). EPDM pond liner would have been a more durable choice, but it is expensive and I had the poly left over as offcuts from skinning the house. EPDM is superior for higher temperatures (which I will avoid - I don't want to cook the seedlings) and for UV exposure (which will not be a factor as the tank is opaque) so I thought this would be a good compromise to save money. Also, since the water won't be used for irrigation or come in contact with plants or soil, I wasn't concerned with leaching anything out of the plastic. 

Instead of relying on the water passively buffering the temperature, I added a heat pumping system. I built a copper pipe heat exchanger, which I wrapped in aluminum soffit material to increase its surface area for better heat transfer. A simpler choice would have been to buy a commercial heat exchanger or salvage an old car radiator, but in these cases the system would have to be protected from freezing. To do that, the choices would be to pump antifreeze through the system (which would require a separate fluid resevoir and real confidence that the system would never leak) or to drain the system if deep freeze temperatures threatened, which would severely limit the season in which I could use it.

With my system, instead of a compact grid of pipes running back and forth, I just have two long runs of copper gently angled back towards the inlet hoses. Since the pump I installed doesn't have a check valve, as soon as it turns off, the system drains itself. The only tricky part I had to deal with in getting it to drain was to ensure that the outlet hose drained to air in the tank in order to prevent a vacuum lock. The pump I used is a simple submersible 12 volt fountain pump. 

IMG-20160326-01472.jpg

At one end of the heat exchanger, I installed a fan to blow air across the surface to increase the heat transfer. By my very rough calculations, the fan is undersized by quite a bit, but it ended up being a compromise of power consumption, heat exchanger efficiency and availability of inexpensive 12 volt devices (thank you, ubiquitous 12 volt computer parts!).

Other than the water hoses at this end of the tank, I also have two temperature sensors - one running into the water and one monitoring the air. The temperatures are fed back to the control system at the other end of the greenhouse. I used DS18B20 sensors, which use a bus system to transmit data - this means I can expand to a larger number of sensors in the future without using up any more inputs (and I only had one run for two sensors this time around). 

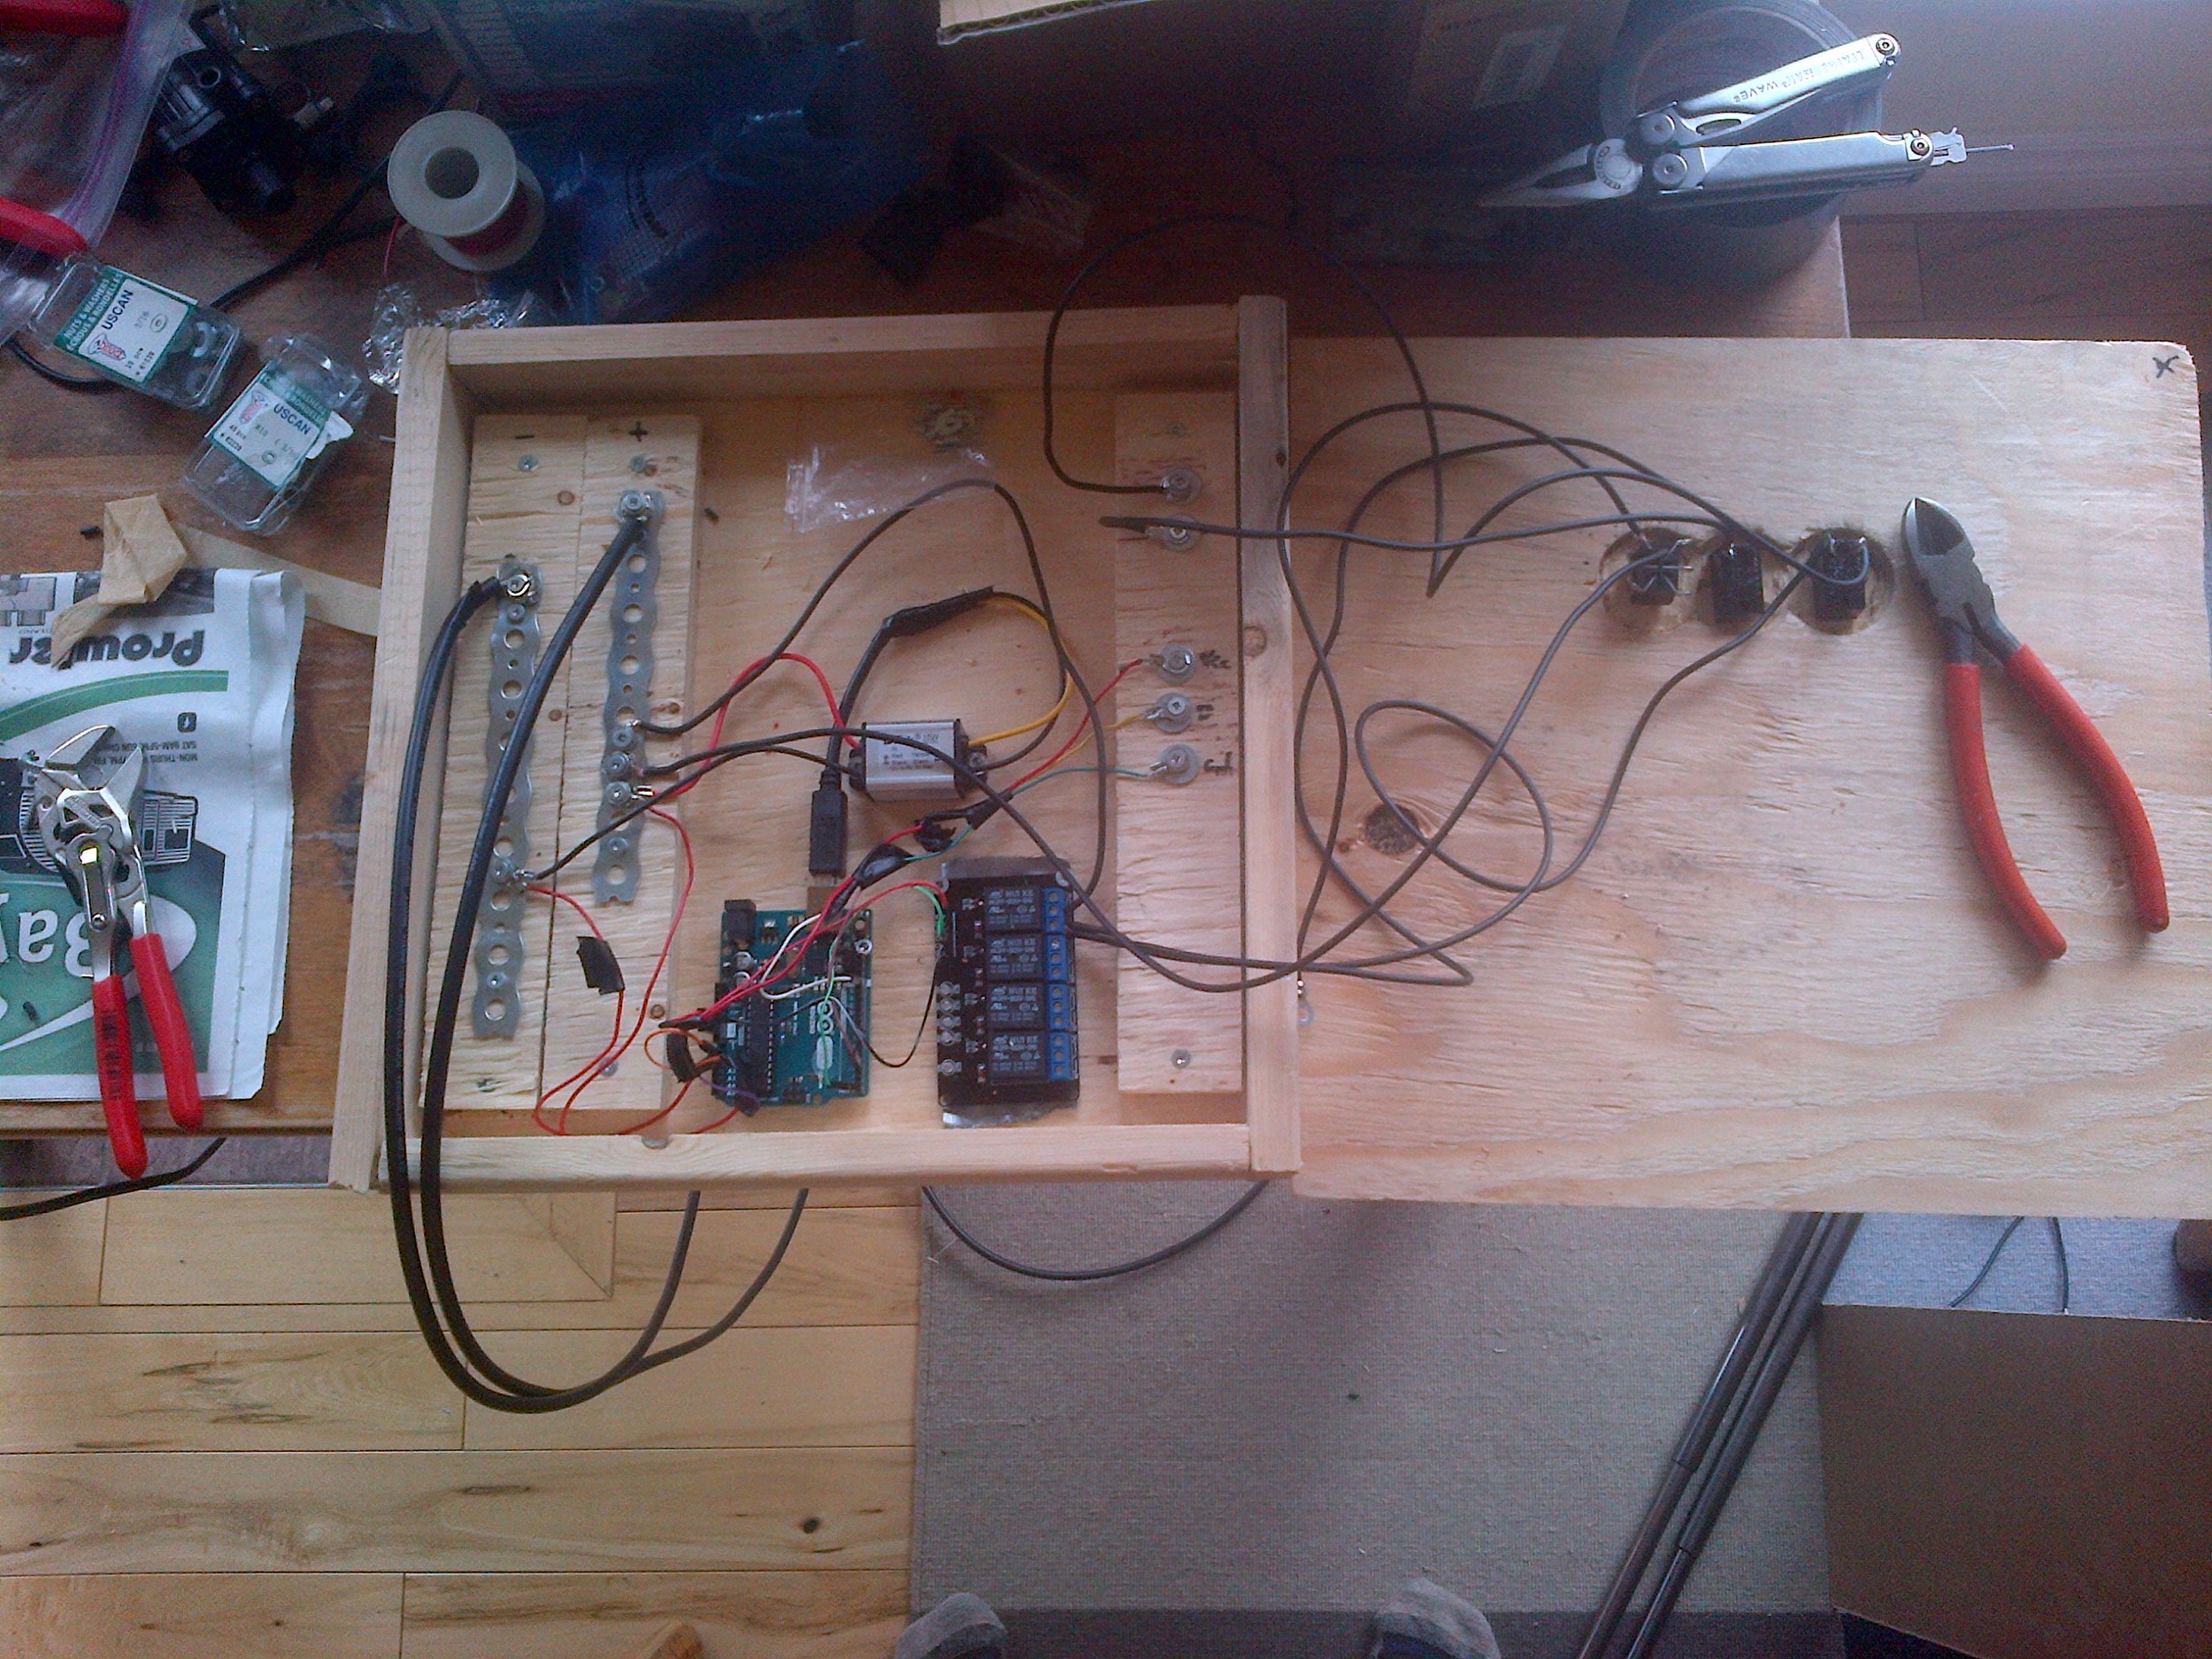
The control system is based on an Arduino board - basically a tiny computer with a bunch of programmable inputs and outputs. The computer watches the temperature of the tank and the air, and also the voltage of my solar system. Based on this information, it decides whether to pump heat into the tank (if the tank is cold and the air is warm), pump heat into the air (if the tank is warm and the air is cold), shut down the system because of dangerous temperatures (freezing or too hot), shut down non-essential functions because of low voltage (to avoid damaging the battery by over-discharging), or turn on an exhaust fan (if the air is too hot in the house). I've also sketched out the code and assigned an output for an irrigation system, but I'm short on irrigation hardware and a resevoir, so I'll be watering by hand for now.

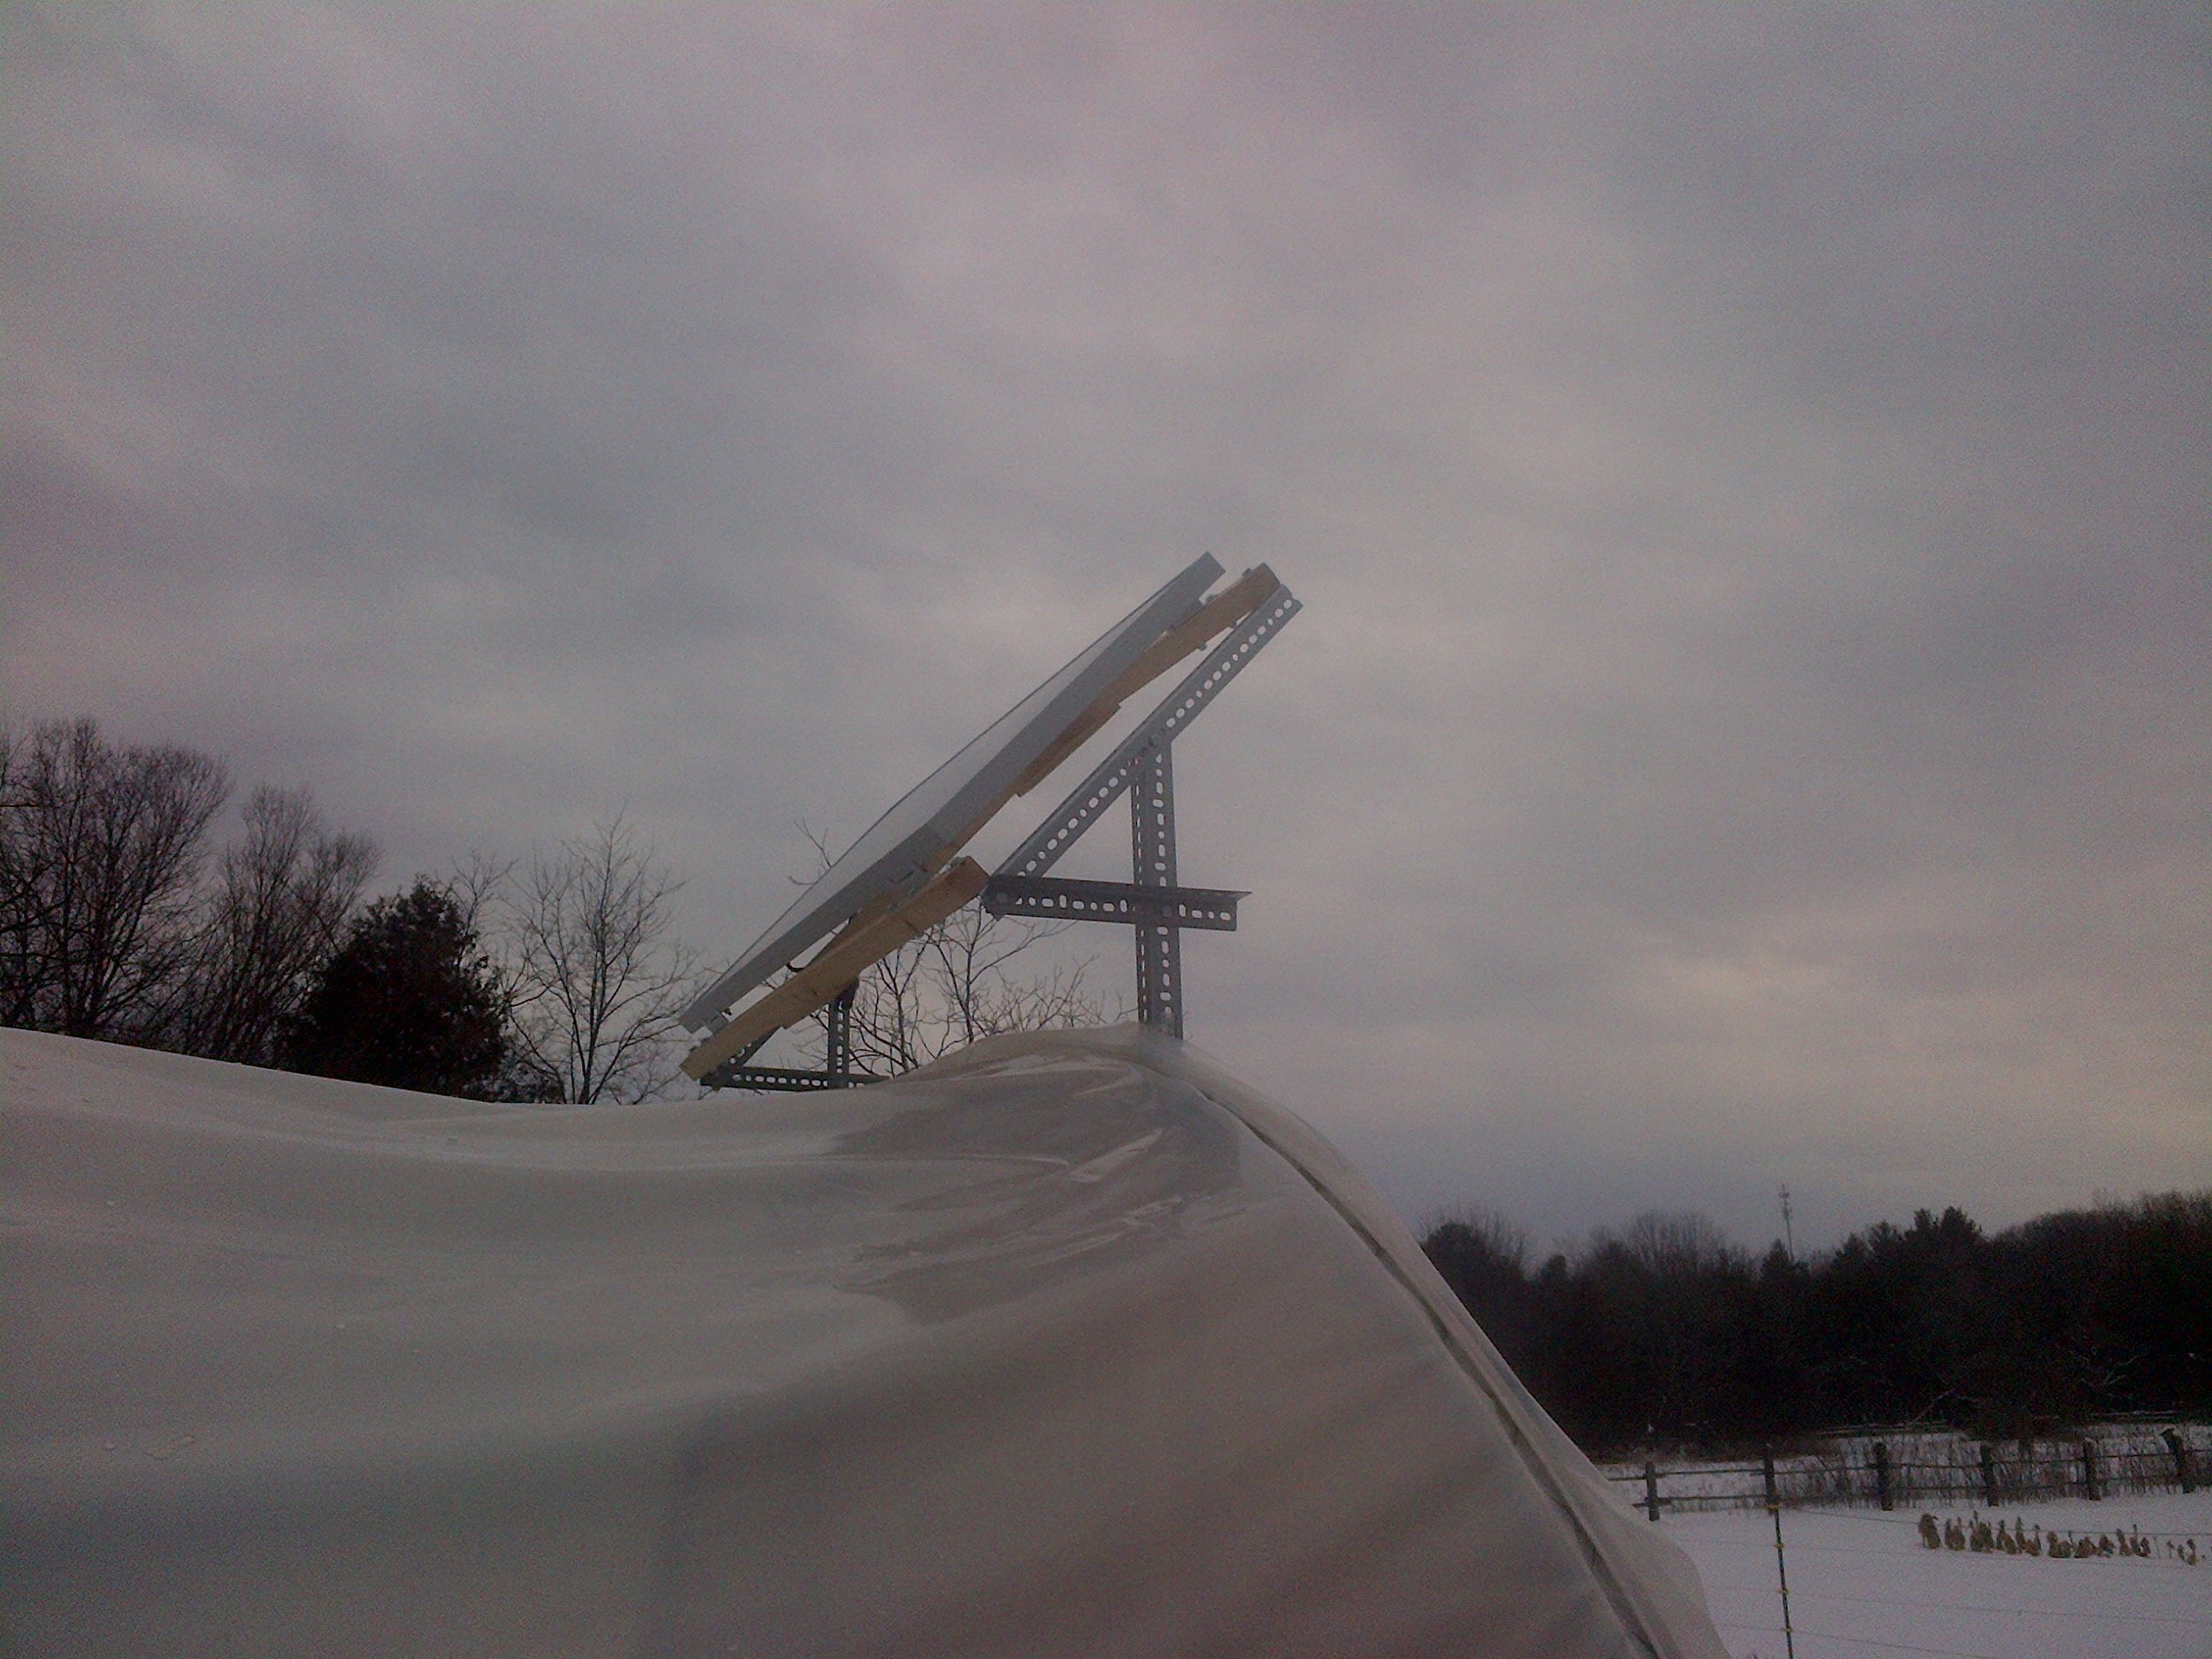
The whole thing (including the air inflation fan, now working 24/7) is powered by a solar system. I installed a 100 watt solar panel at the peak of the north wall, which is the power source. The panel charges a large deep-cycle battery, which is managed by an off the shelf charge controller. By my calculations, I should be able to operate without any sun for about 3 days without damaging the battery, including the power consumption from the future irrigation system. So far, my power consumption seems to be on track with expectations.

I have now had the full system running for a little under a week (although I've had cold tolerant seedlings out since the beginning of March), and it seems to be operating well. I have been shutting down the heat pump at night to prevent it from heating the air so that I can allow the tank to build up a buffer - when I filled it, it was the temperature of our well but I'd rather see it hovering around 15-20 degrees C if possible before I start drawing down overnight. Even so, seedlings on the tank have enjoyed the passive protection of the water - by my measurements it seems like I have about 5 degrees C of protection on top of the tank with a single layer of row cover compared to the ambient air temperature. 

Next step: fill this greenhouse with baby plants! There are plenty in the pipeline and it only speeds up from here. I'm getting excited to get this season going!

Root Cellar Soup

On this frigid Saturday evening deep into February, I'm warming us up with a soup made from some of our stored fall harvest veggies. Into chicken stock seasoned with tamari, sesame oil and kombu seaweed I tossed some lentils, potatoes, beets, carrots, winter radishes and garlic. I could have added some onions too, but the kids always pick them out with wrinkled noses, so I decided to pass for tonight and challenge them with onions another time. All but the lentils came from our basement storage and all were fresh and ready to be used.

Yum! I hope everyone out there is staying warm and dreaming of spring!

Greenhouse Solar Heater

One season-extending upgrade I've added to the new seedling greenhouse is a solar heat absorber.  The idea is to replace part of the south wall with something that will primarily heat the inside air. I used a completely passive design - this system requires no power to run, other than direct solar heat gain from the sun. This basic design was popularized during the energy crisis in the 70s, so it is easy to find reference material to help design it. 

I started out by building the south knee wall "inside out" - that is, I tacked the plywood on to the inside of the framing, instead of the outside. This creates a cavity where the absorber will be built. In the picture below, you can see the cavity as well as some circular ducts I drilled out for cold air in (at the bottom) and warm air out (at the top).

Next, I added two layers of black aluminum window screen, separated  by a small spacer. It is held in place with an additional spacer strip. The screen is attached to the outside of the framing on the top, and to the inside below, so that the screen is actually held at an angle in the cavity. The purpose of the angled fastening is to force the air though the screen as it flows through the system. Cold air enters through the lower ducts (outside of the screen) and is forced back through the screen on its way up towards the upper ducts. Since the black window screen heats up when the sun shines on it, natural convection keeps the air flowing during the day. When the sun goes down, the convection shuts down and the collector acts much more like an insulated wall than like a window.

Finally, the cavity is glazed with corrugated pvc. I chose this material for a couple of reasons. FIrst of all, it is just about the cheapest solid glazing available. The corrugations create more turbulent flow in the absorber which is supposed to increase efficiency. Lastly, I was not sure about using the brittler, more expensive polycarbonate where it might be exposed to huge temperature variations. 

Here is the view from the inside. I've just covered the ducts with scraps of screening. Mainly this is to provide a backstop for the backdraft dampers, but I also felt like it might be necessary to keep the mice and other varmints out of the space.

And here is the system in action! The backdraft dampers are thin pieces of polyethylene plastic taped up above the ducts. At night (or on a very cloudy day), there is not enough airflow to push the plastic out so reverse flow is prevented (in which air would be cooled by the collector).

The day I took this photo was nice and sunny but with weak winter sun. Still, a steady stream of hot air pushed the dampers open. The temperature was probably in the 120 degree F range (although I didn't measure exactly). 

There are many more sophisticated designs out there, but I put this together without really adding any new pieces to the plan with the exception of window screen and glazing. I'm pretty happy with the results so far - we'll see how it does in the early spring when I really need the extra heat. Next up: a solution for how to store heat in the structure overnight.

Goodbye 2015

The snow has finally arrived on the farm in the past few days, and with it the cold, quiet season where we reflect on the past year and plan for the coming one. We wish everyone a happy 2016, full of joy and good food. Check back here soon for info about the 2016 CSA season.

Greenhouse Progress

The new greenhouse is progressing nicely. Two layers of plastic are up on the hoops. This is a change from the last one which only uses a single layer. The advantage of doubling the plastic is that the space between the layers can be inflated with a small fan. This creates an insulating air space and also maintains tension on the plastic which (in theory) reduces stress on it from wind and other weather.

The south end wall is framed and is now glazed with triple layer polycarbonate, which has decent insulating properties while still letting a good amount of light through. Here we are working on a ventilation window which is now covered with polycarbonate. Overheating is a significant concern and I've decided to skip the roll up sides for this one so it's important to be able to move air through the ends

The north end wall is framed and sheathed with plywood. I'll probably add some rigid foam insulation on the inside here. It's quicker to cover the end with clear plastic but very little light comes in from the north so a semi-insulated wall will provide more frost protection without much of a downside.

I hooked up a fan through a length of dryer ducting to test out the system. Because I'm planning on using a solar panel to power everything, I used a 12 volt computer fan as the inflator instead of a specialized greenhouse fan. It's not perfectly suited to the job but it seems to work just fine. I was able to measure the current draw during my test (about 280 milliamps, or about 3.5 watts) as well, which will help me size the solar system. 

Here's the view from inside with the fan running and the polycarbonate in place. The inner layer balloons inwards a bit and the outer layer curves out. It took a minute to inflate enough to be noticeable so at first I thought it wasn't working but once I let it run for a bit it looked great.

Stay tuned in the weeks to come for more updates about the solar panel setup, a passive solar heat absorber, and my thermal battery seedling bench.


Winter Provisions

Each year that we've been growing food (both in the city and out here on the farm), we've gotten a little bit better at putting up the harvest for the winter months. And with each year that our preserving skills improve we gain a bit more independence from a catastrophically unsustainable agricultural system. At year 10, we're still learning as we go, but I'm pretty proud of what we've managed to achieve thus far.

Last week one final haul of veggies came inside in advance of a hard frost predicted for overnight, with winter not far behind.

What do we do with all these veggies? Quick, make pickles or something!

The rest of the haul (and some other things harvested bit earlier) end up in our basement storage place. We don't have a proper cellar, unfortunately, but an unheated stairwell does the trick.

It's cool in the fall and fridge temperatures in the winter. Here lie carrots, beets, cabbage and potatoes, which will last until almost spring. Last year we also experimented with creating an outdoor storage space in the soil itself, but after moving things around a bit in the stairwell and creating more space, we think we can get by without the clamp this time around.

The pickles that I'm currently fermenting on the kitchen counter will ultimately end up here for the winter. This is a new kind of preservation for us. We've done a bit of pickling here and there in the past, but this year I developed something of a minor obsession with lactofermentation (caught up in the biological romance of the whole thing - no really, I'm a big nerd who likes reading about microbes), so I've been trying my hand at pickling just about everything.

Tomatoes were the first thing we canned from our urban rooftop container garden back in 2005 and it's still where the majority of our effort goes during harvest season. Tomato sauce and paste are amazing, versatile, nutrient-dense foods, and can be used in practically every stew, roast, sauce or soup you could think of. This year I made 12 L of sauce and 10 L of paste, which actually fell short of the goal I'd set for myself, but I ran out of time. After we decided to get a pressure canner (I can't believe it took me a decade to even consider getting one!), our canning world expanded and we included a baba ghanoush-like eggplant dip and roasted red pepper paste.

Here are all the fruits, so to speak, of my canning efforts. On the top shelf is an assortment of jam, made from local berries and our own wild pears. I haven't bought jam in a couple of years and I don't intend to ever again. The kids are getting to be efficient berry pickers in their own right and jam making is an easy intro to canning in general, so I'm hoping someday I'll be able hand the whole task of putting up the berry harvest over to them.

Our final storage place is our deep freezer, which is also where some of our berries ended up. We've experimented with freezing corn and sweet peppers in the past, which we may do again in the future, but this year we didn't devote much time to freezing (which is ironic because it's the easiest form of modern food preservation). We learned last year that freezing cauliflower can sometimes go so wrong that the whole freezer requires a deep clean to get rid of the stink. Yuck. Never again.

Cauliflower wasn't our only mistake, but mistakes are how lessons get learned (for the self-taught, especially). I've certainly picked up a good number of lessons over the past 10 years. For example, this year I learned that wide mouth jars are better for freezing because the pressure of food expanding as it freezes can break the necks of a regular mouth jar. Oh, roasted pumpkin puree, I never even got to try you.

The deep freezer also has local meat, primarily grass-fed beef and chicken as well as naturally raised pork. Our meat consumption is not high, and buying in bulk and storing frozen helps with meal planning and cost and avoids the last minute dash to the grocery store to grab meat of unknown origin for dinner. Pastured meat has numerous health and environmental advantages, and staying local reduces our transportation footprint as well as allowing us to visit and get to know the farms where we buy our meat. In fact, we drive past one of these farms daily on the way to school and say hi to the cows grazing the pasture as we pass. This leads to some good conversations with the kids about where meat comes from and our responsibility as meat-eaters to ensure it's raised in a healthy, humane and sustainable way.

We've come a long way with our hippie back-to-the-land dreams. It's been a ton of work, and also immensely satisfying. Cataloguing our food stores for the winter gives me a great sense of accomplishment and pride in our efforts. Stepping outside the modern agricultural system and feeding ourselves from the land around us is one step towards a sustainable future, and I hope we can all get together there someday.